Beautiful embroidery pieces are scattered on my Instagram feed. Liked an eye-catching post once and boom the algorithm delivered. Cannot complain about falling into this rabbit hole. I was intrigued by these embroidery stitches and wanted to know the best ones suitable for beginners.
If like me, embroidery has been on your to-do list, this is the right place to be! Here’s a list of basic embroidery stitches so you don’t have to jump through hoops to learn it. (Pun intended).

10 embroidery stitches anyone can learn!
Why should you learn embroidery?
A relaxing hobby. A medium of passing traditions through generations. A simple décor to hang on a wall or the reason to start a small business. The skill of embroidering opens the door to all of these opportunities.
Gather a good embroidery floss or thread with a needle. Get a fabric and an embroidery hoop. A step-by-step description of the basic embroidery stitches will be our guide.
To know more about supplies in detail check out-https://www.wanderingthreadsembroidery.com/6-essential-hand-embroidery-supplies/
So put the thread through the needle eye and tie a knot at the end. Adjust the fabric in the hoop and we are good to go!
The most basic embroidery stitch is
1. THE RUNNING STITCH
You can find extensive use of this stitch in Japanese Sashiko embroidery.
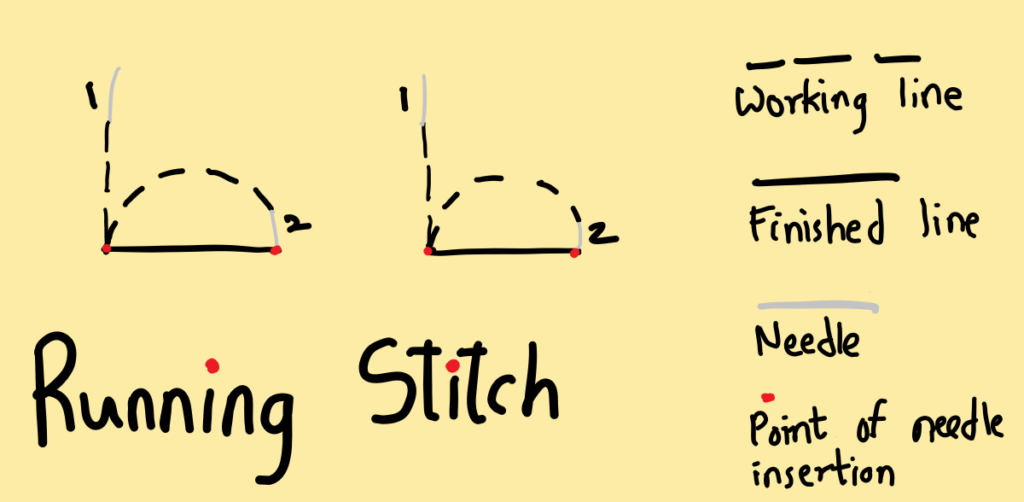
- Pull the thread upwards through the fabric.
- After some distance poke the needle and bring the thread towards the back. (Step 1+2 make a single stitch)
- After leaving the distance equal to the previous stitch, Poke the needle to pull the thread towards the front side.
- Repeat the action to form a line with breaks in between.
Tip: Use the sewing method to speed up the embroidering process. The length between the stitches can be decided based on aesthetic needs.
2. THE BACK STITCH
This stitch is ideal for adding alphabets onto your fabric.

- Poke the needle through the fabric and pull the thread to the front side.
- Go one stitch forward and pull the thread towards the back.
- Poke the needle approximately one stitch ahead of the previous one. Pull the thread up.
- Now bring the needle upwards through the end of the previous stitch (Backstitch).
- Continue this process to form a line without breaks.
Tip: This can also be carried out using the stabbing or sewing method.
https://www.thesprucecrafts.com/stabbing-vs-sewing-method-in-embroidery-4136616 has given discrete information about both methods.
3. THE STEM STITCH
The glorious stems and slithering vines are brought into existence by this stitch.
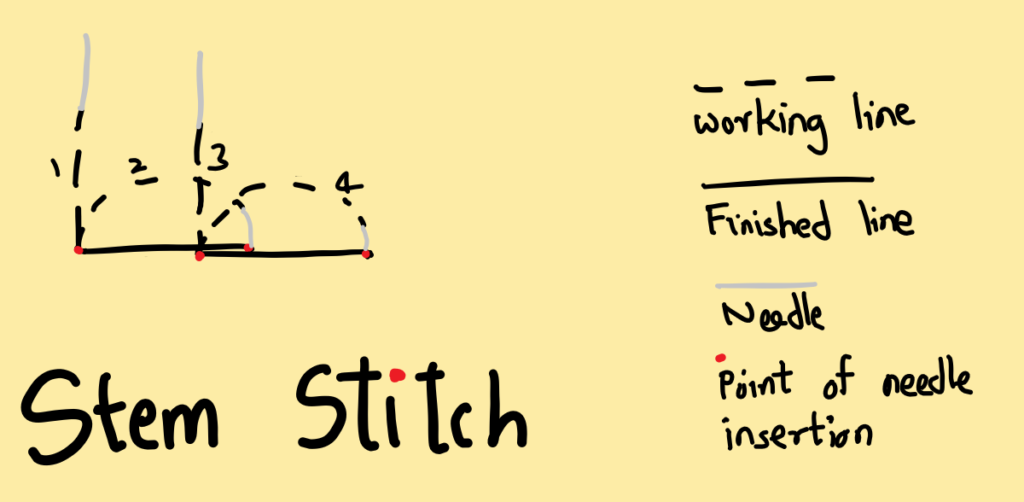
- Make a single stitch.
- Poke the needle upwards through the fabric. Make it parallel to the previous stitch either halfway or 1/3 of its distance.
- Continue this pattern to achieve desired shapes.
4. THE SATIN STITCH
atin stitch is used to fill the spaces in the starry night embroidery above.
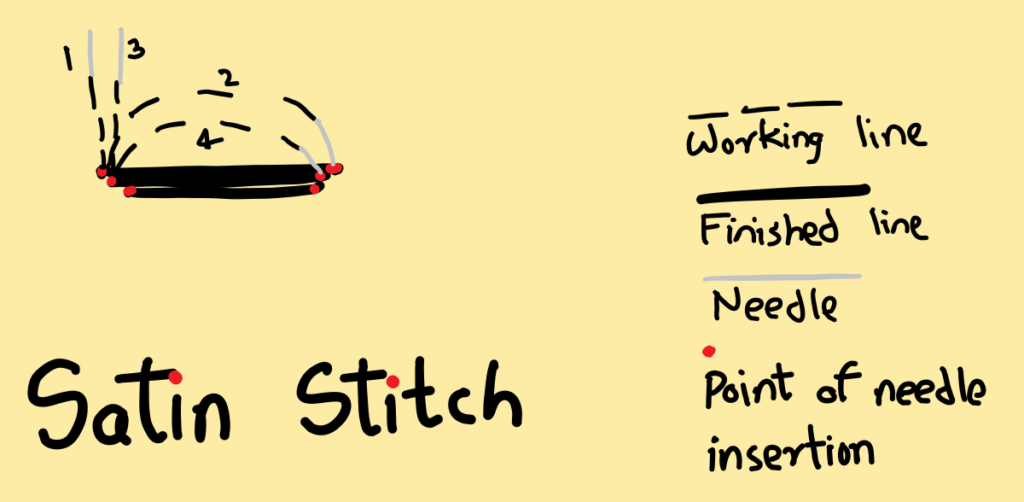
- Make a single stitch (Refer to the first two steps of running stitch)
- Make the next stitch as close to the previous stitch (Parallel to each other) by repeating the same procedure.
- You can create shapes according to your will by changing the length of stitches.
Tip: Use this stitch to hide the background and fill shapes with a smooth texture
5. THE SPLIT STITCH
This stitch can be used in embroidery when the floss has more than one strand. Preferably an even number. It helps to embroider tendrils and curved lines on the fabric.
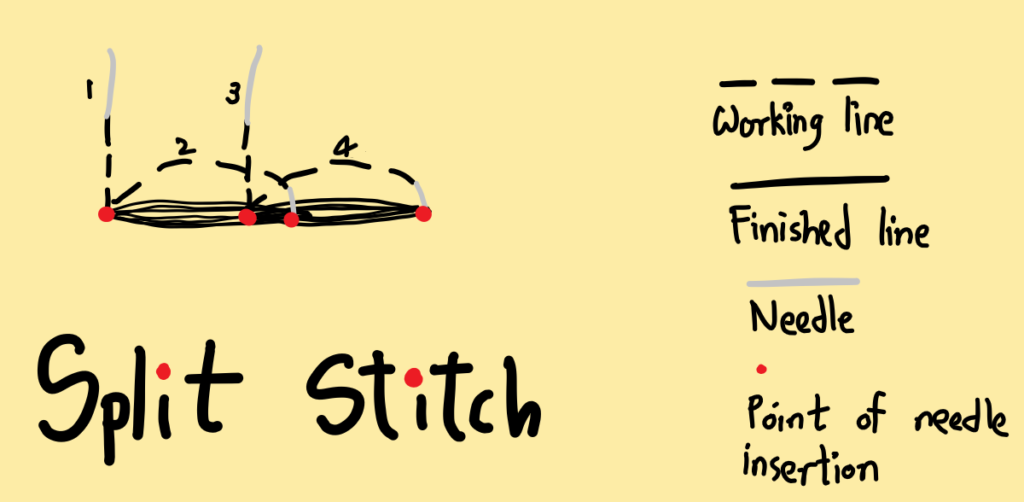
- Make a single stitch.
- Bring the needle upwards through the fabric, 1/3rd or halfway behind the end of the first stitch.
- Make sure the needle passes through the fibers of a thread instead of between the threads.
- Now pull the needle downwards following the same distance as the first stitch.
- Continue the same process to form a row of split stitches.
6. THE CHAIN STITCH
It gives an appearance of a braided pattern.
- Poke the needle to the front side.
- Put the needle through the same hole to the backside. Except don’t pull the thread downwards completely. Let a loop remain.
- Poke the needle to the front leaving the gap of a stitch.
- Pull the needle through the loop but not too tightly. The loop should be visible.
- Bring the needle downwards through the same hole as the last one. Again don’t pull the thread completely, let a loop remain.
- Bring the needle up to the front from a stitch’s distance and put it through the loop.
- Continue the same process ahead.
7. THE DETACHED CHAIN STITCH
Use this stitch to form individual petals and leaves. Perfect for a spring-inspired design!
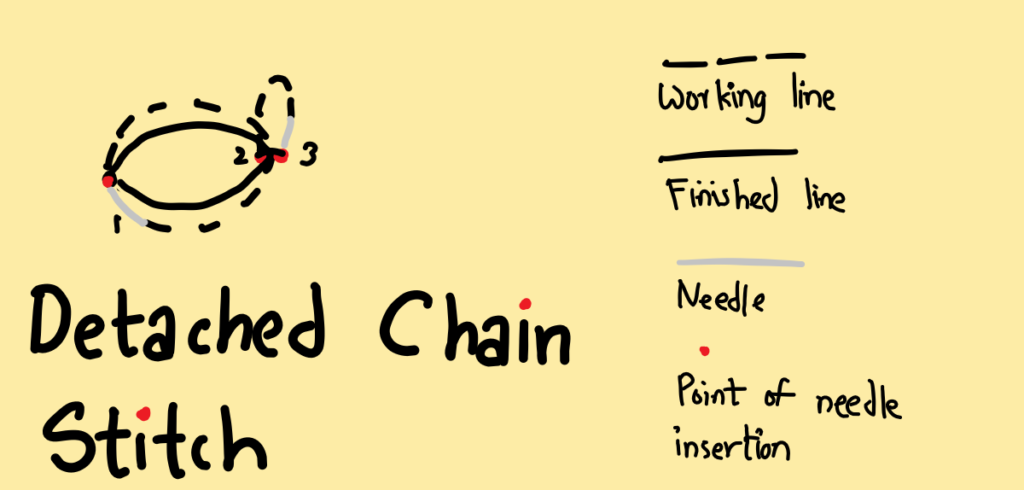
- Bring the needle to the front side.
- Put the needle back through the entry hole but leave a loop on the surface.
- Pull the needle up through the fabric. Put the needle inside the loop some distance away from the point of the initial hole.
- tighten the loop but leave it relaxed enough to form a drop shape.
- Now poke the needle to the back parallel the second hole securing the structure of the stitch.
8. THE BLANKET STITCH
It is traditionally used to secure the edges of blankets hence the name. It can be used to form a decorative outline.
- Consider three points 1, 2, and 3 as shown in the picture below.
- Poke the needle through 1 and bring it over to 2 pulling the thread downwards.
- Bring the needle out through 3 and loop the thread under the needle.
- Pull the needle upwards. Continue the same process.
Tip: To give an interesting look to your art pieces, experiment with the length of vertical stitches.
9. THE FLY STITCH
You can use it individually or in a continuous line. Let your imagination guide you while you incorporate this stitch in your art.
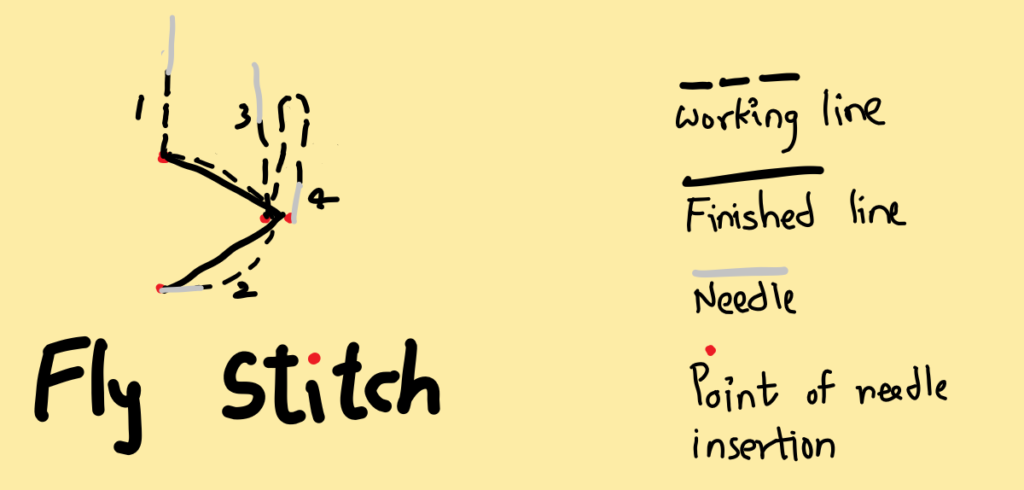
- Pull the needle up to the front through point 1.
- Poke the needle back through point 2. Let a loop of thread remain between the two points.
- Bring the needle up through point 3 that is slightly above the center of points 1 and 2.
- Pull the thread till the loop becomes taut (V shape is formed) but refrain from pulling it too tight.
- Put the needle through point 4 right above point 3 and secure the V shape.
- Continue the same pattern
10. THE FEATHER STITCH
This is probably the most detailed one out of our embroidery stitches. As the name suggests, feather stitch is used to make feathers in the embroidery piece. Leaves and outlines can be stitched too.
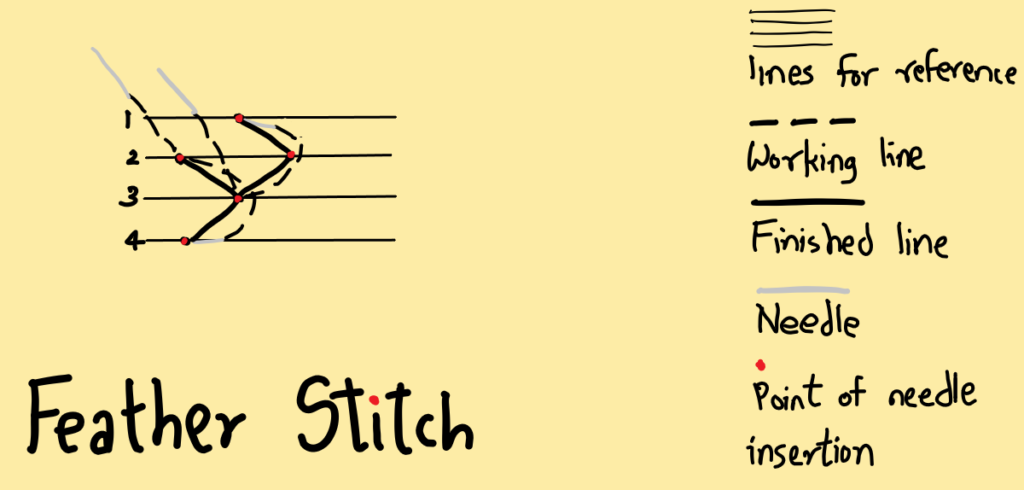
- For achieving symmetry, draw 4 parallel lines labeled 1,2,3, and 4.
- Pull the needle up through line 2
- poke it towards the back through line 4 leaving a loop above.
- Now bring the needle up through the fabric inside the loop through line 3. It should be diagonal to the holes on lines 2 and 4.
- Make it taut (Forms V)
- Poke the needle on line 1 parallel to the hole on point 3. Pull the thread downwards leaving a loop.
- Now pull the thread up through line 2 diagonal to the two points on 1 and 3.
- Make it taut to form a V
- Continue the procedure alternating between left and right.
Where do we go from here?
Like any art form, your embroidering skills will get permanent with practice. Once you are thorough with these basic embroidery stitches, explore the complex ones. The nuances of this art and the intuition to know which stitch to use will come with experience.
There are various templates to refer to on the internet. However, it is best to use your original ideas and bring them to life on the fabric.
We at Podium school have formed an environment ideal for honing the artistic abilities of children. If you are interested in learning artistic skills such as calligraphy and the art of origami, be sure to check our blogs.
Share with your friends


